Unlocking The Magic Of Butterfly Drawing: A Comprehensive Guide
Embarking on the journey of butterfly drawing is an incredibly rewarding experience, offering a unique blend of artistic challenge and serene beauty. Whether you're a complete novice picking up a pencil for the first time or a seasoned artist looking to refine your skills, the delicate allure of butterflies provides an endless source of inspiration. This guide will walk you through everything you need to know, from basic techniques to exploring diverse artistic styles, ensuring your creations truly take flight on paper.
Many how-to-draw-a-butterfly tutorials found on the internet tend to be overly simple, presenting wings with just a few circles, or conversely, overly complex, detailing complete monarchs with dozens of intricate shapes. Our aim here is to strike a balance, providing clear, actionable steps that empower you to create beautiful and expressive butterfly art, regardless of your current skill level. We'll delve into various styles, techniques, and inspirations, making the process enjoyable and accessible for everyone.
This post may contain affiliate links. As an Amazon Associate, I earn from qualifying purchases. See our full disclosure here.
Table of Contents
- The Enduring Allure of Butterfly Drawing
- Getting Started: Essential Tools for Your Butterfly Drawing Journey
- Deconstructing the Butterfly: Simple Steps for Realistic Forms
- Beyond Realism: Exploring Diverse Butterfly Drawing Styles
- Adding Life and Vibrancy: Color, Pattern, and Expression
- Troubleshooting Common Challenges in Butterfly Drawing
- Finding Inspiration and Resources for Your Butterfly Art
- The Therapeutic Benefits of Butterfly Drawing
The Enduring Allure of Butterfly Drawing
Butterflies are truly a gift to artists. Their delicate forms, vibrant colors, and graceful movements make them a captivating subject. Whether you want to practice drawing lines and shapes, or you want to capture their delicate, intricate wing designs, a butterfly offers boundless opportunities. Learning how to draw a butterfly is a great way to improve your drawing skills and express creativity, regardless of whether you’re a beginner or an experienced artist.
Drawing a butterfly can be an enjoyable and rewarding experience, especially when you break down the process into simple steps. It's not just about replicating an image; it's about understanding form, light, and the subtle nuances that bring a drawing to life. Butterflies are a great subject to draw for both beginner artists and advanced artists because their structure, while seemingly complex, is built upon fundamental shapes and symmetry.
Why Butterflies? A Canvas of Nature's Art
Beyond their aesthetic appeal, butterflies symbolize transformation, hope, and beauty. This makes them a popular motif in art, design, and even literature. When you engage in butterfly drawing, you're not just creating an image; you're connecting with these deeper meanings. A simple butterfly is pretty easy to draw even without a tutorial, but how about a pretty butterfly with a little bit more detail? This article will guide you to add that extra layer of charm and realism, or even imaginative flair, to your artwork.
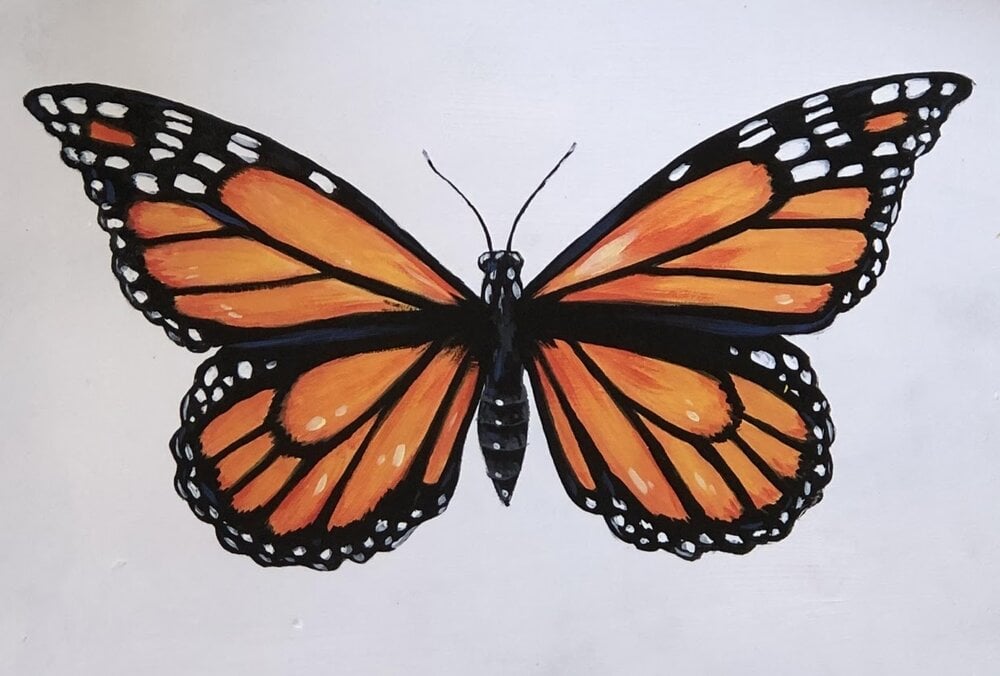
The variety within the butterfly world is immense. From the majestic Monarch to the tiny Blue Morpho, each species presents its own unique patterns and color palettes. This diversity means you'll never run out of inspiration when exploring butterfly drawing. You can learn how to draw cute and colorful butterflies with different shapes, sizes, and styles, making each drawing a fresh and exciting endeavor.
Getting Started: Essential Tools for Your Butterfly Drawing Journey
Before we dive into the actual drawing, let's talk about the basic tools you'll need. You don't need an expensive art studio to start; a few simple items will suffice:
- Pencils: A range of graphite pencils (HB, 2B, 4B) will allow you to create different line weights and shading. HB is great for initial sketches, while softer leads (B series) are excellent for darker lines and shading.
- Paper: Any good quality drawing paper will do. For beginners, a standard sketch pad is perfect. For more detailed work or if you plan to add watercolors, opt for thicker paper. Instructions for how to draw a butterfly often start with basic paper setup.
- Eraser: A kneaded eraser is fantastic for lifting graphite without damaging the paper, and a vinyl eraser is good for precise corrections.
- Reference Images: Having a few clear images of butterflies will be incredibly helpful. You can find free butterfly drawing photos for download, or simply observe real butterflies if you have the chance.
- Optional: Colored pencils, markers, watercolors, or pastels if you plan to add color. A blending stump or cotton swab for smooth shading.
One useful tip for symmetrical drawings, like butterflies, is to fold a paper lightly in half both ways or lightly draw a cross line that divides the middle. This provides a central axis and guides for ensuring your wings are balanced.
Deconstructing the Butterfly: Simple Steps for Realistic Forms
Learning how to draw a butterfly with simple steps and a realistic body involves breaking down the complex form into manageable shapes. This approach makes the process less intimidating and more enjoyable.
The Foundation: Head, Body, and Antennae
Every great drawing starts with a solid foundation. For a butterfly, this means establishing the central body and head first. Think of the body as a elongated oval or a series of connected ovals, tapering slightly towards the tail.
- Draw the Head and Body: At first, draw the head and body of the butterfly. The head is a small circle or oval at the top. The body (thorax and abdomen) extends downwards from the head, usually as a longer, slightly curved shape. Imagine a peanut or a series of connected beads for the body.
- Add the Antennae: Next, draw 2 curved lines coming off the top of the head with a swirl at each end for the antennae. These add character and life to your butterfly. Make the line on the left side of the head curve out to the left, and make the line on the right side of the head curve out to the right, creating a symmetrical and graceful appearance.
Keep these initial lines light. They are merely guidelines that you can refine or erase later. This foundational step is crucial for ensuring your butterfly has a balanced and believable structure.
Mastering the Wings: Shape, Symmetry, and Detail
The wings are arguably the most captivating part of a butterfly. They come in countless shapes and sizes, but the underlying principle of symmetry is key.
- Outline the Wing Shapes: From the body, sketch out the general shape of the upper and lower wings on each side. Remember, butterflies have four wings: two larger forewings and two smaller hindwings. Pay attention to the overall silhouette. Some butterflies have round wings, others have more angular or pointed ones.
- Ensure Symmetry: This is where your light cross line or paper fold comes in handy. Try to make the wings on one side mirror the wings on the other. This doesn't have to be perfect, as nature itself has slight variations, but a good degree of symmetry will make your butterfly look realistic.
- Add Wing Veins: Once the basic shapes are down, start adding the delicate wing veins. These are like the skeletal structure of the wing and provide a framework for the patterns. Observe reference images closely to understand the typical vein patterns for different butterfly species.
- Refine and Detail: Now, you can start refining your lines, making them darker where needed and adding more specific details to the wing edges. This is where you can truly make your butterfly unique. Think about the subtle curves and dips along the wing margins.
Follow the tutorials and watch the video (if available) to create your own butterfly drawings. Many resources offer step-by-step guidance, helping you to create your own butterfly with round wings and a colorful pattern, or any other style you desire.
Beyond Realism: Exploring Diverse Butterfly Drawing Styles
While drawing a realistic butterfly is a fantastic skill, the world of butterfly drawing is vast and allows for immense creative freedom. You can learn how to draw butterflies with different styles, techniques, and inspirations, moving beyond strict realism to explore more expressive forms.
From Kawaii Charm to Whimsical Flourishes
The beauty of butterfly drawing lies in its versatility. You're not confined to just one look:
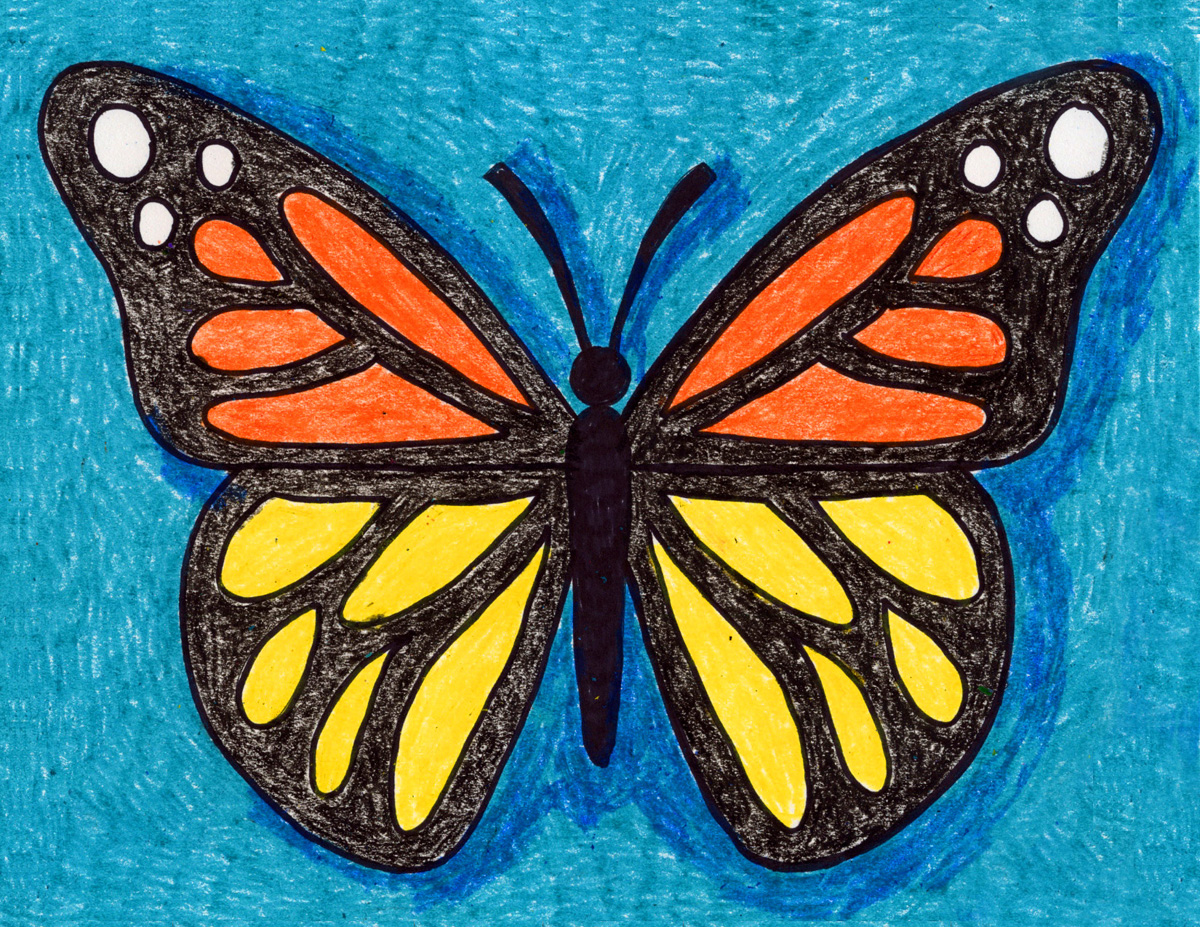
- Kawaii Style: This popular Japanese art style emphasizes cuteness. For a kawaii butterfly, think bigger eyes, simpler shapes, and often a more rounded, plump body. The colors tend to be bright and cheerful. You can learn how to draw a butterfly in different styles, from kawaii to cartoon, with easy steps and pictures. Imagine a happy butterfly 🦋 flapping its wings, full of joy and excitement, perhaps with rosy cheeks!
- Cartoon Style: Similar to kawaii but with more exaggerated features. Cartoon butterflies can have expressive faces, dynamic poses (like a butterfly with its wings fluttering, looking excited), and simplified patterns.
- Minimalist Style: This approach focuses on essential lines and shapes, stripping away unnecessary detail. Learn how to draw butterflies with minimalist and whimsical styles in this blog by focusing on the silhouette and perhaps one or two key features. It's about capturing the essence with fewer strokes.
- Whimsical Style: Here, imagination takes the lead. Wings might be adorned with fantastical patterns, or the butterfly might be interacting with magical elements. It's about letting your creativity flow and creating something truly unique and enchanting.
- Stylized & Abstract: You can even push the boundaries further, using butterflies as a starting point for abstract patterns or highly stylized designs, perhaps incorporating geometric shapes or intricate mandalas within the wings.
Don't be afraid to experiment! The goal is to express your unique artistic voice. Think about the mood or emotion you want to convey. Do you want to depict a happy butterfly 🦋 flapping its wings, full of joy and excitement, or a serene one resting on a flower?
Adding Life and Vibrancy: Color, Pattern, and Expression
Once you have the basic form of your butterfly drawing, adding color and pattern is where it truly comes alive. This step allows for immense personalization and expression.
- Color Choices: Butterflies are known for their incredible array of colors. You can stick to realistic color palettes based on specific species, or let your imagination run wild. Consider complementary colors to make your butterfly pop, or analogous colors for a harmonious look. Remember, 🌈 let your beauty shine and bring smiles to everyone you meet with your vibrant color choices.
- Wing Patterns: This is where the intricate details come in. Butterfly wings often feature spots, stripes, eyespots, and complex geometric designs. Study reference images to understand these patterns. You can also invent your own unique patterns, creating a truly fantastical creature.
- Shading and Dimension: Don't just color flatly. Use shading to give your butterfly depth and dimension. Think about where light would hit the wings and body, and where shadows would fall. This adds a realistic touch, even to stylized drawings.
- Expression and Movement: Even a static drawing can convey movement and emotion. The angle of the wings, the slight curve of the body, and the tilt of the head can all contribute to the butterfly's "personality." Imagine a butterfly with its wings fluttering, looking excited, and try to capture that energy. You can even add subtle lines to suggest motion, giving the impression of a happy butterfly 🦋 flapping its wings.
Experiment with different mediums for coloring – colored pencils for precision, watercolors for soft blends, or markers for bold statements. Each medium offers a different texture and feel to your butterfly drawing.
Troubleshooting Common Challenges in Butterfly Drawing
Even experienced artists face challenges. Here are a few common hurdles in butterfly drawing and how to overcome them:
- Symmetry Issues: If your wings look uneven, go back to your initial light guidelines. Use a ruler or a light fold in the paper to re-establish a central axis. Practice drawing mirrored shapes separately to improve your hand-eye coordination.
- Stiff or Lifeless Drawings: Sometimes drawings can look flat. This often comes from drawing too rigidly. Try to draw with looser, more flowing lines in the initial stages. Think about the natural curves of the butterfly's body and wings. Imagine it in motion – 🌟 fly high little friend, spread your colorful wings and explore the world around you – and try to capture that dynamic energy.
- Lack of Detail: If your butterfly looks too simple, revisit your reference images. Pay attention to the tiny details in the wing patterns, the texture of the body, and the delicate antennae. Don't rush; building up detail takes time.
- Proportion Problems: If the head seems too big or the wings too small, it's a matter of observation. Compare your drawing to your reference. Use simple geometric shapes (circles, ovals, triangles) to block out the major components before adding details.
- Fear of Color: If you're hesitant to add color, start with simple palettes. Choose two or three colors that you know work well together. Practice blending and layering colors on a separate piece of paper before applying them to your main drawing.
Remember, every mistake is a learning opportunity. Don't be discouraged; keep practicing, and you'll see significant improvement.
Finding Inspiration and Resources for Your Butterfly Art
The world is full of inspiration for your butterfly drawing endeavors. Beyond real-life observation, there are countless digital and physical resources:
- Online Image Libraries: Websites offer vast collections of butterfly drawing images. You can download free PNGs, stickers, photos, videos, aesthetic backgrounds and wallpapers, vector illustrations, and original art. There are 83,826 free images of butterfly drawing available, making it easy to find an image of butterfly drawing to use in your next project.
- Art Books and Guides: Invest in books on drawing insects or nature. They often provide detailed anatomical diagrams and various artistic interpretations.
- Social Media and Art Platforms: Explore platforms like Pinterest and Instagram. Search for "butterfly drawing," "butterfly art," or "how to draw butterflies" to see what other artists are creating. You'll find more ideas about butterfly drawing, butterfly, and butterfly art than you can imagine.
- Nature Documentaries: Watching documentaries about butterflies can give you a deeper understanding of their movement, habitat, and behavior, which can inspire more dynamic and contextual drawings.
- Drawing Prompts: Look for drawing challenges or prompts online. For example, you might find "40 easy cute butterfly drawing ideas" that can spark new creative directions.
- Editable Mockups and Templates: If you're venturing into digital art or design, explore editable mockup and template designs featuring butterflies for inspiration on how they are used in various contexts.
The key is to actively seek out inspiration and to keep your eyes open to the beauty around you. The more you observe, the richer your drawings will become.
The Therapeutic Benefits of Butterfly Drawing
Beyond the artistic skill development, engaging in butterfly drawing offers significant mental and emotional benefits. It's a mindful activity that can reduce stress and promote relaxation.
- Mindfulness and Focus: The act of drawing requires concentration, pulling your attention away from daily worries and focusing it on the present moment. This can be incredibly calming.
- Stress Reduction: Creative activities like drawing are known to lower cortisol levels, the body's stress hormone. The repetitive motions and the focus on detail can be meditative.
- Boosts Creativity and Problem-Solving: As you figure out how to translate a three-dimensional butterfly onto a two-dimensional surface, you're engaging your problem-solving skills. Experimenting with styles and colors also boosts your creative thinking.
- Sense of Accomplishment: Completing a drawing, especially one that you're proud of, provides a wonderful sense of achievement and boosts self-esteem.
- Emotional Expression: Art is a powerful outlet for emotions. Whether you draw a happy butterfly 🦋 full of joy and excitement, or a serene one, your art can reflect and process your feelings.
So, as you pick up your pencil and begin your butterfly drawing, remember that you're not just creating art; you're nurturing your well-being. It's a wonderful way to unwind, express yourself, and connect with the beauty of the natural world.
Conclusion
The journey of butterfly drawing is one of continuous discovery and joy. We've explored everything from setting up your workspace and mastering the foundational shapes to experimenting with diverse styles like kawaii and whimsical, and adding vibrant colors and expressive patterns. We've also touched upon common challenges and the myriad of resources available to fuel your artistic endeavors, not to mention the profound therapeutic benefits this art form offers.
Whether you're aiming for a realistic rendition or a fantastical creation, remember that the most important tool is your willingness to explore and express. So, grab your pencils, find an inspiring image, and let your creativity take flight. We encourage you to share your butterfly drawings in the comments below – we'd love to see your beautiful creations! For more drawing guides and artistic inspiration, explore other articles on our site.
This is How to Draw a Butterfly in 10 Steps | Skillshare Blog
Easy How to Draw Butterfly Tutorial Video and Coloring Page

Butterfly Drawing
